How to Connect OpenAI Agent Builder Workflows to Your WordPress Chatbot
This guide shows you how to create an AI Agent in OpenAI’s Agent Builder and connect it to your WordPress site using the S2B AI Assistant plugin. As an example, we’ll build an SEO Rewrite Agent that checks the readability/SEO score of an article at a given URL and rewrites it if the score is
below a chosen threshold. In the end, you’ll have a chatbot on your site that can take a URL from the user, analyze it, and return an improved, SEO-friendly version of the content.
How It Works
- Create an Agent workflow in OpenAI Agent Builder (for example, “SEO Rewrite Agent”).
- Publish the Agent and copy its Workflow ID (looks like
wf_xxx...). - Paste that Workflow ID into the ChatKit / Agent settings in your WordPress admin.
- Add the generated shortcode to any page or post to display your chatbot.
- Add your WordPress site’s domain to the OpenAI Domain Allowlist so the Agent can be called from your site.
Step 0: Install S2B AI Assistant wordpress plugin
More details and installation instruction you can find here
Step 1: Create your Agent in OpenAI Agent Builder
First, you’ll create the actual AI Agent that knows how to check and rewrite SEO content.
- Open Agent Builder
Go to https://platform.openai.com/agent-builder and log in
to your OpenAI account. - Create a new workflow
Click the Create button. Agent Builder will create a new workflow with two default nodes:- Start – where the workflow begins.
- My Agent – the main AI Agent node that will handle user requests.
You’ll configure the My Agent node to become your SEO Rewrite Agent.
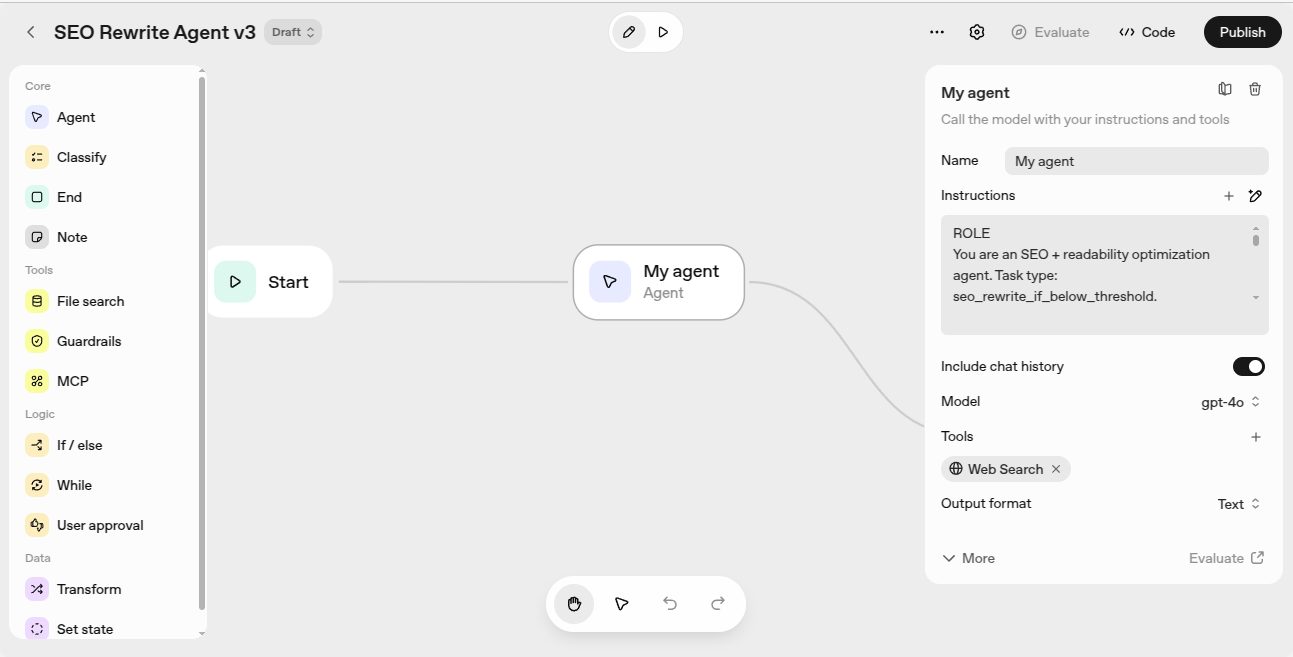
- Open the Agent settings
Click on the My Agent node to open its configuration panel. Here you’ll see:- Agent name and description
- Agent instruction (the most important part)
- Model selection
- Tools and other options
- Add your Agent instruction
In the Agent instruction field, paste the instruction text for your SEO Rewrite Agent. You can:- Write it yourself, describing in plain language what the Agent should do, or
- Ask ChatGPT to generate it. For example, you might ask:
“Write instructions for an SEO rewrite Agent which checks a URL and, if its score is less than some value, rewrites the article. Optionally allow the user to pass a minimum Flesch score (e.g., 65).”
After you have the instruction, paste it into the Agent Builder Agent instruction field.
- Keep the instruction reasonably short
Agent Builder may silently truncate very long instructions. To avoid this:- Try to keep your instruction under ~3000 characters.
- Focus on clear rules and examples, not long essays.
- If you later notice the Agent “ignores” some rules, check whether the text was cut off and shorten it.
- Enable the Websearch tool
Your Agent needs to actually read the URL content. In the tools section for the Agent:- Click Add tool.
- Select Websearch (or the current browsing/fetching tool that allows loading page content).
- Save the configuration.
This lets the Agent fetch and analyze the article content from the URL the user provides.
- Select the model
Inside the Agent settings, choose a model such as:- gpt-4.1 – high quality, great for SEO/content tasks.
- gpt-4.1-mini – more cost-efficient for large numbers of calls.
You can change models later without breaking the WordPress integration.
- Add an End node
Back on the canvas:- Add a new End node.
- Connect the output of My Agent to the End node.
Your basic workflow should now look like this:
Start → My Agent → End
Step 2: Publish the Agent and copy the Workflow ID
Once the workflow logic is ready, you need to publish it so WordPress can use it.
- Click “Publish Agent”
In the top-right corner of the Agent Builder interface, click the Publish Agent button. - Enter a name and confirm
In the publish dialog:- Give your Agent a clear name (e.g., SEO Rewrite Agent).
- Optionally add a short description.
- Click Publish.
- Copy the Workflow ID
After publishing, OpenAI shows a popup with a Workflow ID, for example:Workflow ID: wf_abc123xyz...
Click the Copy button and keep this ID somewhere safe (clipboard, notes, etc.).
You will paste it into your WordPress admin in the next step.
Step 3: Configure the ChatKit shortcode in WordPress
Now you’ll connect the published Agent to your WordPress site via S2B AI Assistant.
- Open the ChatKit / Agent settings
In your WordPress admin, go to the S2B AI Assistant Pro settings page that manages ChatKit/Agents. For example:https://yourwebsite.com/wp-admin/admin.php?page=s2baia_agent - Paste the Workflow ID
Find the field labeled something like Workflow ID and paste your ID (for examplewf_abc123xyz...). - Save settings
Click Save or Update. The plugin will now use this Agent workflow when the relevant shortcode is loaded. - Note the shortcode
The settings page usually shows you a shortcode you can use, for example:[s2baia_chatkit_widget workflow="wf_693...." mode="modal" label="SEO Rewrite Agent" launcher_bg="#1a73e8" launcher_color="#ffffff"]
Keep this handy for the next step.
Step 4: Add the shortcode to a page or post
To make the Agent available to your visitors:
- Create or edit a page/post in WordPress (for example, “SEO Content Helper”).
- Paste your shortcode into the content area. For example:
[s2baia_chatkit_widget workflow="wf_693..." mode="modal" label="SEO Rewrite Agent" launcher_bg="#1a73e8" launcher_color="#ffffff"] - Publish or update the page.
When visitors open that page, they’ll see a chatbot powered by your OpenAI Agent Builder workflow. They can paste a URL, optionally specify a minimum Flesch score, and receive an improved version of the article.
Step 5: Add your site’s domain to the OpenAI Domain Allowlist
For security reasons, OpenAI only allows Agents to be called from domains that you explicitly approve. If your site’s domain is not on the Domain Allowlist, the Agent may not work properly (or at all).
- Open the Domain Allowlist settings
Go to:
https://platform.openai.com/settings/organization/security/domain-allowlist
- Add your production domain
Add entries like:https://yourwebsite.comhttps://www.yourwebsite.com(if used)
Only add the domain (and protocol), not individual page paths.
- Optionally add staging / dev domains
If you test on a staging or local site, you can also add:https://staging.yourwebsite.comhttp://localhostorhttp://localhost:3000(for local testing)
- Save changes
Once the domains are added and saved, calls from your WordPress site to the Agent Builder workflow should be allowed.
Example Use Case
Imagine you run a content site and want to quickly improve older blog posts:
- You open your “SEO Content Helper” page with the chatbot.
- You paste a blog URL and type a minimum Flesch score of 65.
- The Agent fetches the article, evaluates readability and SEO, and only rewrites it if the score is too low.
- You copy the rewritten version back into your post, or provide it to your editor for review.
Requirements
- An active OpenAI account with access to Agent Builder.
- The S2B AI Assistant (free) plugin installed and active.
- A WordPress site served over HTTPS (recommended).
- Your site’s domain added to the OpenAI Domain Allowlist.
Feedback
This integration is being refined with real-world use cases. If you have ideas, issues, or requests (for example, more SEO tools, multiple workflows per page, or custom UI options), we’d love to hear them.
Share your thoughts via the feedback form.